


Choosing the right logo size for a hat can be tricky because the decoration area is small, curved, and different from one style to another. This hat logo size guide explains why there is no single perfect measurement for every cap.
The right hat embroidery size depends on placement, crown profile, panel construction, artwork shape, and decoration method.
How Big Should a Logo Be on a Hat? Quick Size Guide
Most front hat logos start somewhere around 3.5 to 4.5 inches wide and 1.5 to 2.25 inches high, but that does not mean every logo should fill that space.
The selected hat’s approved decoration area is always the final guide.
A structured trucker hat, soft dad hat, low-profile cap, visor, and beanie all give the artwork a different canvas.
Think of standard measurements as starting points, not production guarantees.
A machine or supplier may technically allow a larger design, but the logo can still look too tall, too wide, or too close to the seams.
Wide wordmarks, tall crests, circular badges, and text-heavy logos should not be forced into the same box. The goal is not to make the logo as large as possible, but to make it readable, balanced, and appropriate for the cap.
Standard Hat Logo Size Chart at a Glance
| Placement | Practical starting range | Best uses | Main restrictions |
| Center front | 3.5–4.5″ wide × 1.5–2.25″ high | Main logo, team mark, company name | Crown height, center seam, bill seam |
| Small front or offset front | 2–3″ wide × 1–1.5″ high | Lifestyle marks, icons, initials | Visual balance, small text clarity |
| Side | 1.5–2.5″ wide × 0.75–1.25″ high | Dates, flags, small sponsor marks | Eyelets, seams, crown curve |
| Back above opening | 2–3″ wide × 0.75–1.25″ high | URLs, team names, short slogans | Strap, buckle, snap, rear opening |
| Small monogram | 1–2″ wide × 1–1.5″ high | Initials, simple marks | Stitch detail, spacing, proportion |
These ranges are common starting points. They should be checked against the exact cap model, artwork, and decoration method.
If you are still shaping the concept, Alpha Imprint’s hat design ideas guide can help you choose a design direction before finalizing the logo’s width, height, and placement.
Why There Is No Universal Hat Logo Size
Two hats can fit the same adult head but offer very different decoration areas. Crown height, seams, curvature, lining, foam structure, eyelets, closures, and machine access all affect the amount of usable space available.
This is why asking what size should a logo be on a hat does not have one universal answer.
In custom hat logo sizing, the exact product matters. A high-profile structured cap can support a taller front mark than a soft low-profile dad hat.
A technical maximum may also look visually oversized once the hat is worn, especially if the artwork crowds the bill, seams, or panel edges.
Alpha Imprint; Trusted Local Partner for Custom Hats in Houston
Local Support From Artwork Review to Finished Embroidery
Alpha Imprint helps local businesses review whether a logo will reproduce clearly on the selected hat style, size, and placement. This is useful because the artwork, thread, cap structure, and production method should be evaluated together, not separately.
For brands planning embroidery in Houston, local artwork review can help catch small lettering, thin outlines, or awkward proportions before production begins.
Companies ordering custom hats in Houston can also compare cap profiles, side placements, patch options and embroidery methods before approving the final design.
Branded Hats for Businesses, Schools, Teams, and Events
Branded hats can support employee uniforms, team identity, school events, trade show giveaways, retail merchandise, staff recognition and marketing campaigns. Logo sizing matters because it affects visibility, comfort and brand consistency.
A logo that looks strong on a large screen can feel crowded on a curved crown.
Businesses that want to use promotional products in Houston can coordinate hats with other branded items while keeping the hat design practical.
The best result is a cap people want to wear, not just a logo-adorned giveaway.
Creative Resources for Planning the Right Hat Artwork
Logo sizing gets easier once the design direction is clear. A simple monogram, wide wordmark, round badge, mascot, or patch-style mark will each need different dimensions.
If your team is still exploring which artwork works best on fabric, the embroidery ideas guide can help narrow the visual direction before sizing begins.

Hat Dimensions and Logo Sizing Terms You Should Understand
Before approving a hat logo, it helps to separate four ideas: physical hat size, crown dimensions, decoration area, and finished logo size. They are related, but they are not the same thing.
Hat dimensions describe the actual product: crown height, bill length, panel shape, and overall structure. Finished design dimensions specify the artwork’s final width and height.
A fitted cap size tells you how the hat fits the head; it does not automatically tell you how large the embroidery field will be.
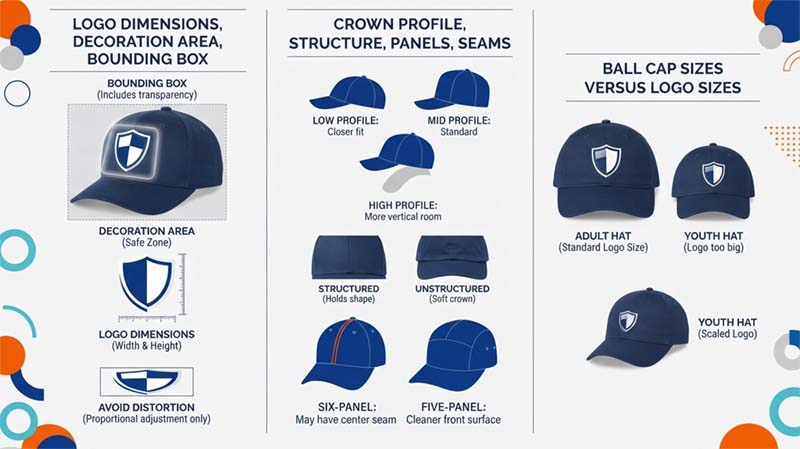
Logo Dimensions, Decoration Area, and Bounding Box
Logo dimensions are the finished width and height of the design.
The available logo area is the safe part of the hat approved for decoration. The logo must fit inside that area without touching seams, restricted edges, eyelets, or the bill seam.
A bounding box is the rectangle that contains the entire artwork.
This matters because extra transparent space in a file can make a logo appear larger than it really is. Width and height should also be adjusted proportionally.
Stretching only one direction can distort the brand mark and make it look unprofessional.
Crown Profile, Structure, Panels, and Seams
Low-profile crowns sit closer to the head. Mid-profile caps offer a balanced front area. High-profile caps often provide more vertical room for artwork.
A structured hat usually holds its shape with a firmer front, while an unstructured crown can fold or curve around dense embroidery.
Panel construction also matters. A six-panel cap may have a center seam that divides the front. A five-panel or broad-front cap may give wide artwork a cleaner surface.
Still, the exact panel shape and crown height matter more than the category name.
Crown curvature, eyelets, the bill seam, foam backing, and lining can all change the usable area.
Ball Cap Sizes Versus Logo Sizes
Fitted cap sizes relate to head circumference. Adjustable cap size refers to a closure system that fits a range of heads. Neither one guarantees a larger embroidery space. A larger fitted hat does not automatically create a proportionally larger decoration field.
Youth caps often need a smaller or simplified version of the artwork. A logo that works on adult caps may become too tall, too detailed, or too crowded on smaller crowns.
Logo Placement on Hats: Front, Side, and Back Dimensions
The best way to plan hat logo size and placement is to evaluate each physical location separately. Each placement has a different job.
The front carries the main identity. The side adds secondary detail. The back supports small text, dates, URLs, or team names.
Availability can vary by product, especially when seams, mesh, eyelets, closures, straps, and buckles reduce usable space.
Visual centering matters too. A mathematically centered logo may still look off if the artwork is asymmetrical.
A designer or decorator may need to adjust the placement so the design feels balanced when worn.
Center-Front and Offset-Front Logo Placement
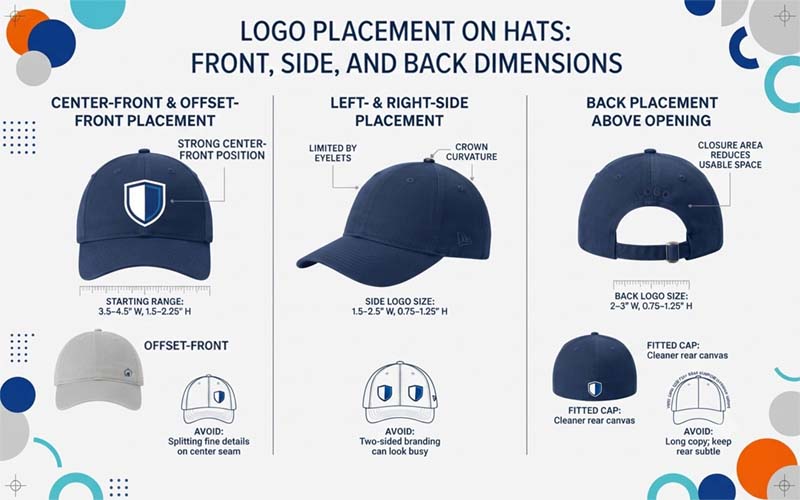
The center front is the strongest position for company logos, team marks, monograms, and primary branding. A practical starting range is about 3.5–4.5 inches wide and 1.5–2.25 inches high.
That range works well for many caps, but the exact decoration field must be confirmed.
Offset-front placement is useful for smaller lifestyle logos, icons, or premium-looking marks. It can make a cap feel more retail-focused and less like a standard uniform item.
Six-panel caps require extra care because the center seam can divide letters or fine details. Placing a logo too high can also make it feel disconnected from the bill.
There is no single fixed distance above the bill that works on every hat; the decorator should confirm placement on the actual model.
Left- and Right-Side Logo Placement
Side logos usually work best around 1.5–2.5 inches wide and 0.75–1.25 inches high. This area is ideal for initials, dates, small sponsor marks, flags, icons, or secondary branding.
A logo on the side of the hat should support the front design, not compete with it.
Side placement is limited by eyelets, seams, crown curvature, and sometimes mesh panels.
Puff embroidery may not be available on certain side placements, depending on the production setup. A small hat logo on one side can feel clean and intentional; two-sided branding should be balanced carefully so the cap does not look crowded.
Back Logo Placement Above or Around the Opening
Back logos often start around 2–3 inches wide and 0.75–1.25 inches high.
This area works for straight text, arched text, short URLs, dates, slogans, team names, and small symbols. Rear hat embroidery is usually subtle, so short wording is better than long copy.
Adjustable caps have an adjustable cap opening, strap, buckle, snap, or closure area that reduces usable space.
Closed-back fitted caps may offer a cleaner rear canvas because there is no opening.
Mesh-backed trucker hats may require a patch, label, or alternate solid placement instead of standard rear embroidery.
Practical Starting Logo Dimensions by Hat Style
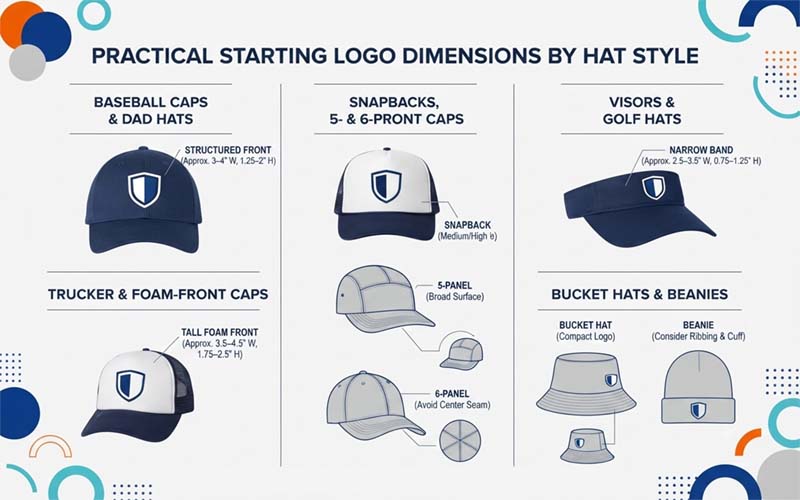
The chart below gives starting points for common styles. Product specifications should always override category-level recommendations.
| Hat style | Typical crown profile | Most useful placement | Suggested starting size | Main sizing concern |
| Baseball cap | Low to mid | Center front | 3–4″ wide × 1.25–2″ high | Center seam, crown curve |
| Dad hat | Low, soft | Small front or side | 2.5–3.5″ wide × 1–1.75″ high | Soft crown distortion |
| Trucker hat | Mid to high | Front panel | 3.5–4.5″ wide × 1.75–2.5″ high | Foam density, mesh limits |
| Snapback | Mid to high | Front center | 3.5–4.25″ wide × 1.5–2.25″ high | Structured front, brim style |
| Five-panel cap | Low to mid | Wide front | 3–4.5″ wide × 1.25–2″ high | Panel width and height |
| Six-panel cap | Low to high | Center front | 3–4″ wide × 1.25–2″ high | Front seam |
| Visor | Narrow band | Front band | 2.5–3.5″ wide × 0.75–1.25″ high | Limited height |
| Beanie | Folded cuff | Cuff front | 2–3″ wide × 1–2″ high | Stretch and fold position |
| Bucket hat | Curved panel | Front or side | 2–3.5″ wide | Curved panel seams |
Use this hat style comparison as a planning tool, not a final proof. The safest way to apply a logo to hat orders correctly is to confirm custom hat logo dimensions using the exact product template.
Baseball Caps and Dad Hats
Structured baseball caps often support a front logo around 3–4 inches wide and 1.25–2 inches high.
Baseball hat dimensions vary by brand, so the crown height and approved decoration area should be checked before production.
Dad hats are usually softer and more relaxed. Dense embroidery can pull or wrinkle a soft crown, especially if the logo has heavy fills.
Horizontal logos often work well, while circular marks may need careful scaling.
Text-only designs should be short enough to remain readable. Youth sizes may need a smaller version of the same logo.
Trucker Hats and Foam-Front Caps
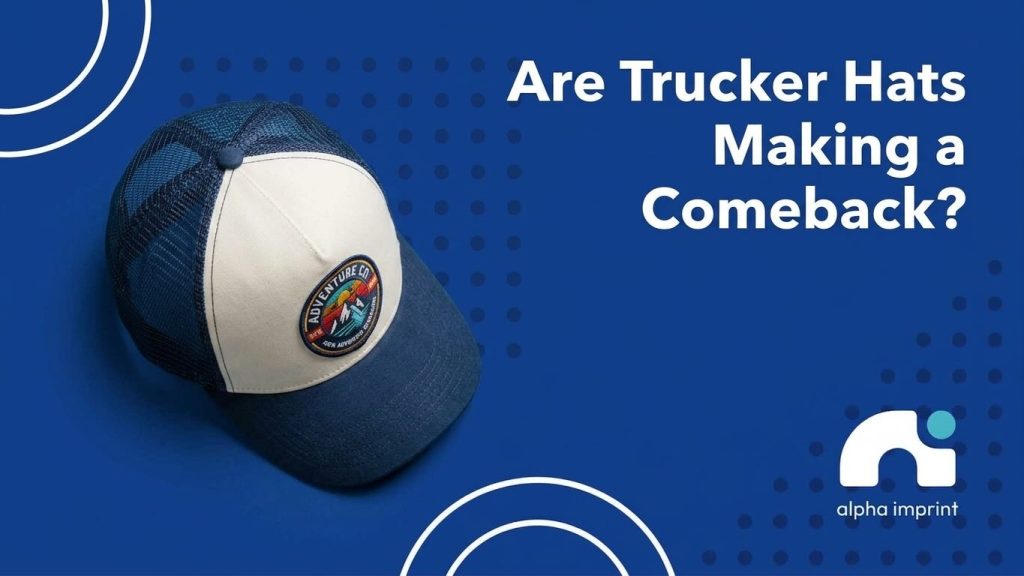
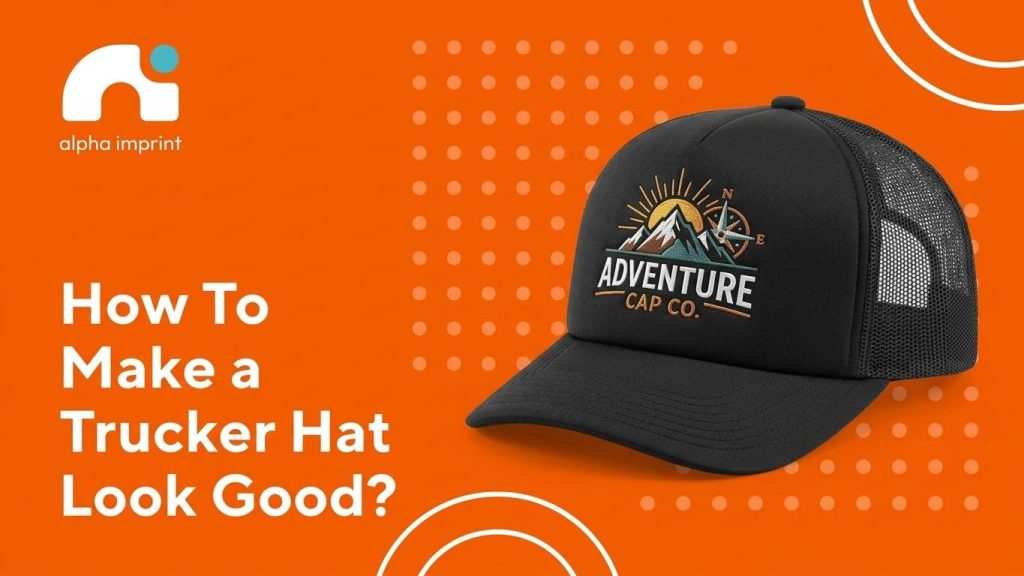
Trucker hat logo size depends heavily on the front panel. Some trucker hats have low or medium fronts, while foam-front versions may provide a taller surface.
Many high-profile trucker fronts can start at around 3.5–4.5 inches wide and 1.75–2.5 inches high, depending on the product.
Foam fronts often support bold graphics, but stitch density and digitizing must be handled carefully.
Trucker hat logo placement is usually centered on the front, though offset-front logos can work for lifestyle brands.
Mesh sides and backs may limit direct embroidery; patches and woven labels can be better options in some cases.
Trucker hats are one of the most popular types of hats to place your logo upon, choosing a company that does hat logo embroidery every day is important to get good results. At Alpha Imprint we do custom trucker caps in Houston, and we can deliver them across the whole nation in less than 12-14 days.
Snapbacks, Five-Panel Caps, Six-Panel Caps, and Fitted Hats
Snapback refers to the closure, not to a universal crown shape.
Many snapback hats have structured, medium- or high-profile fronts, which makes snapback embroidery suitable for bold central logos. Be sure to check our catalog of custom embroidered snapback hats in Houston, Texas.
Still, the actual crown height and panel template should be checked.
Five-panel caps can work well for broad rectangular artwork when the front panel is flat and uninterrupted.
Six-panel caps often require more care because the center seam can split letters or small central details.
Fitted hats describe sizing and closure style, not one single crown shape. Closed-back fitted caps can also create useful rear-logo opportunities.
Visors and Golf Hats
A visor has a narrow front band, so visor logo size should stay compact. A practical starting range is about 2.5–3.5 inches wide and 0.75–1.25 inches high. Short text, initials, compact horizontal logos, and simplified marks work best.
Tall emblems and taglines usually do not fit well.
A golf cap is different from a visor because it has a full crown. Golf cap embroidery often works well with small front logos, side marks and sponsor-style placement.
Lightweight performance fabrics may require careful thread density and backing.
Bucket Hats and Beanies
Bucket hats have segmented, curved panels, which make curved panel embroidery more sensitive to shape and placement.
Compact logos around 2–3.5 inches wide often work better than tall designs. Front and side placements can both work, depending on the panel layout.
Beanies need a different approach. Cuff depth, ribbing, stretch, and whether it is folded or unfolded all affect the logo.
Many cuff designs start around 2–3 inches wide and 1–2 inches high. Dense embroidery can limit stretch, while changing the fold can hide or distort the artwork. Patches are often a strong option for knit products.
How Embroidery and Decoration Methods Change Logo Size
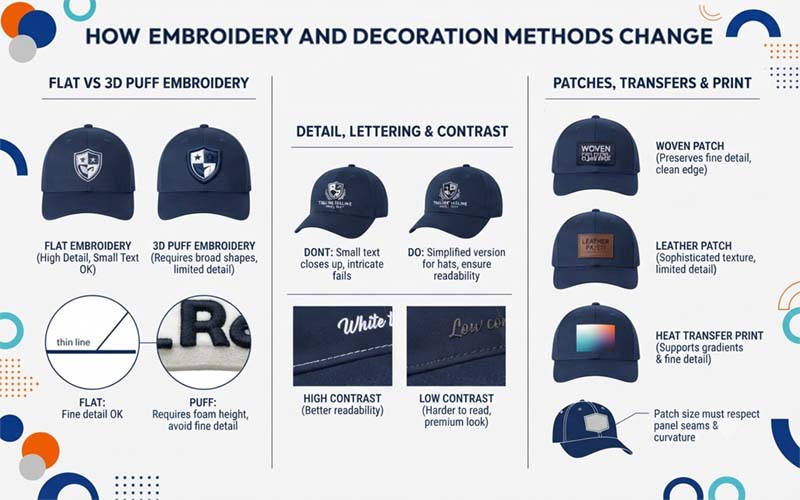
The same logo dimensions may not work equally well for flat embroidery, 3D puff, patches, and printed decoration. A 3-inch logo may be perfect as a patch but too detailed for direct embroidery. A T-shirt design should not simply be shrunk and placed on a cap.
For hat embroidery size, the key questions are:
How detailed is the logo? How stable is the fabric? How much space does the stitch path need? Can the machine access the placement cleanly?
Small text and thin lines should be reviewed by the decorator before approval.
Flat Embroidery Versus 3D Puff Embroidery
Flat embroidery is usually more flexible for small text, outlines, filled shapes, side logos, and back placements. It can handle more detail than puff, but it still has limits.
3D puff embroidery needs broad shapes, enough spacing, and strong stroke width. Fine outlines, narrow letters, tiny gaps, and detailed artwork often fail in puff because foam adds height under the stitches. Separate digitizing may be needed for flat and puff versions.
Detail, Lettering, Thread Colors, and Negative Space
Small text and thin lines can close up after stitching. A logo with a tagline, gradient, or intricate illustration may need a simplified secondary version for hats. Do not assume the original brand mark will work at a smaller size.
Minimum embroidery text size should be confirmed with the production team rather than guessed. Embroidery detail also depends on thread contrast.
Light thread on a dark cap can improve readability, while low contrast may look premium but be harder to read.
Patches, Transfers, and Printed Hat Logos
An embroidered patch, woven patch, leather-style patch, or printed patch can sometimes preserve details better than direct embroidery.
Patches also create a clean edge shape and can cover a slightly larger area, depending on the cap structure.
A printed hat logo or heat transfer logo may support gradients and fine detail on suitable surfaces.
However, patch and print dimensions still need to respect panel seams, curvature, and attachment space.
How to Measure, Prepare, and Test a Hat Logo Before Production
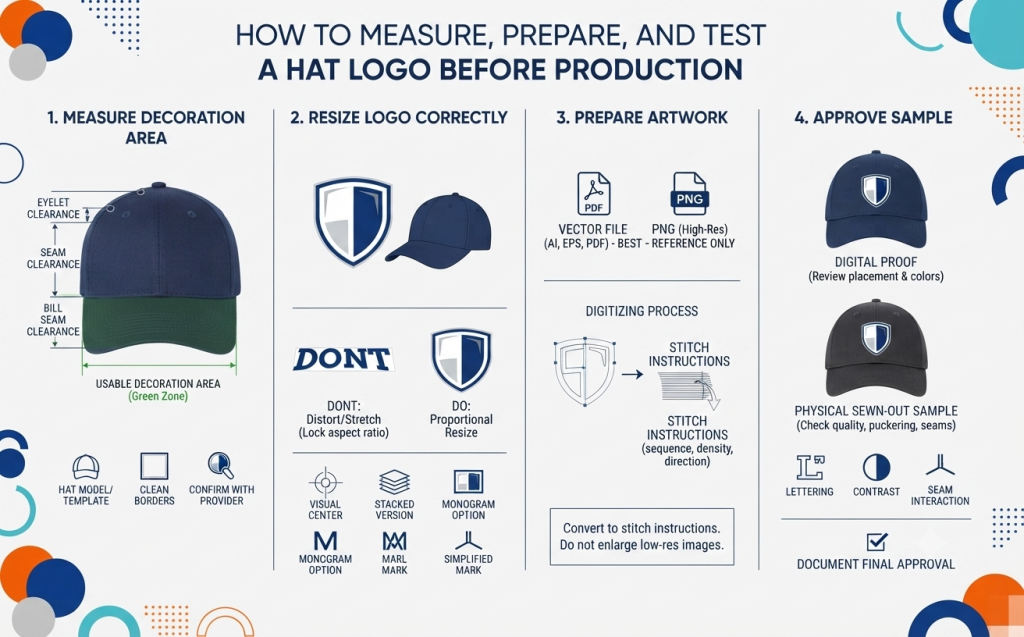
A good logo size is not guessed; it is tested. Mockups are helpful, but they cannot fully show how thread sits on a curved crown.
Before approving production, confirm the product model, artwork size, placement, colors, and decoration method.
Measure the Usable Decoration Area
- Get the exact hat model or supplier template
- Identify seams, eyelets, the bill seam, opening, strap and restricted areas
- Leave clearance around boundaries
- Compare the logo’s shape with the available area
- Confirm the final measurements with the embroidery provider
This process helps you measure hat dimensions in a way that matters for production, not just appearance.
Resize Without Stretching or Distorting the Logo
Keep the logo aspect ratio locked when resizing. Width and height should not be changed independently unless the designer intentionally redraws the mark.
Wide, vertical, square, circular, and irregular logos all behave differently on a crown.
Asymmetrical marks may also need visual centering. Instead of squeezing the original artwork into a narrow space, create a horizontal version, stacked version, monogram, icon, or simplified hat-specific mark.
Prepare the Artwork for Digitizing
Editable vector files such as AI, EPS, or PDF are usually best for production review. A transparent high-resolution PNG may help with reference, but it is not an embroidery machine file.
Embroidery digitizing converts artwork into stitch instructions, including stitch type, sequence, direction, density, and underlay.
Strong embroidery-ready artwork gives the digitizer a better foundation. Do not manually enlarge a low-resolution image and expect clean stitching.
Approve Proof or Sewn Sample
Ask for a production proof that shows finished size and placement. For large, retail, uniform, or high-value orders, a pre-production cap sample or embroidery sew-out is worth considering.
Review the hat mockup carefully, but remember that a digital image cannot show every material issue.
Check lettering, alignment, color contrast, puckering, seam interaction and visibility from a normal viewing distance.
Documenting approval of the final size, placement, colors, and proof helps prevent misunderstandings before bulk production.
Common Hat Logo Sizing and Placement Mistakes
The most common hat logo mistakes happen when buyers treat hats like flat apparel. A cap has seams, curves, panels, and limited height. Avoid these issues before production.
Making the Logo as Large as the Maximum Area
An oversized logo may technically fit but still look crowded. Do not push artwork too close to the seams, eyelets, bill, or panel edges. Leave intentional negative space so the design feels balanced.
Shrinking Detailed T-Shirt Artwork Onto a Hat
A complex embroidery design with taglines, gradients, shadows, or tiny illustrations may fail at hat size. Create a simplified mark specifically for the cap instead of forcing a large apparel graphic into a small area.
Ignoring the Exact Hat Model and Production Proof
Generic mockups cannot account for every crown, seam, material, or closure.
Choosing dimensions before selecting the blank can lead to incorrect logo size, embroidery placement problems, oversized hat logo, or off-center embroidery.
Conclusion
The right logo size starts with the exact hat model, placement, crown structure, artwork proportions, and decoration method. Use this hat logo size guide as a starting point, not a universal rule.
Looking for accurate sizes for hat logo placement? Review the artwork, proof and sample with Alpha Imprint before production.